
ECOMMERCE INTEGRATION
Integrating
Your Shopify

-
Shopify & ParcelDaily – Setup Guide (Easy Step-by-Step)
Login to Your Shopify Account
- Go to the Shopify Login Page
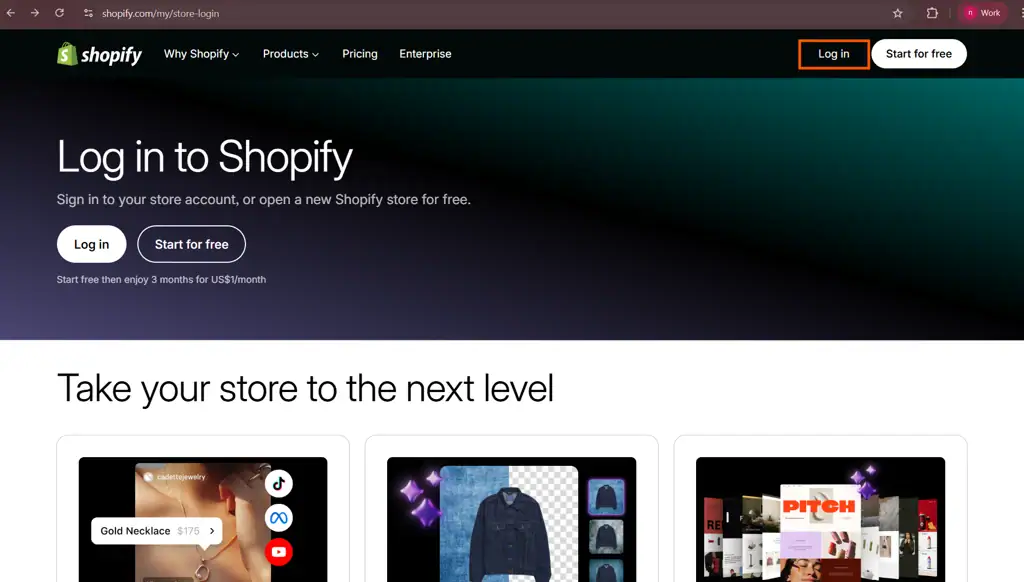
- Enter your email and password.
- Click on “Log In”.
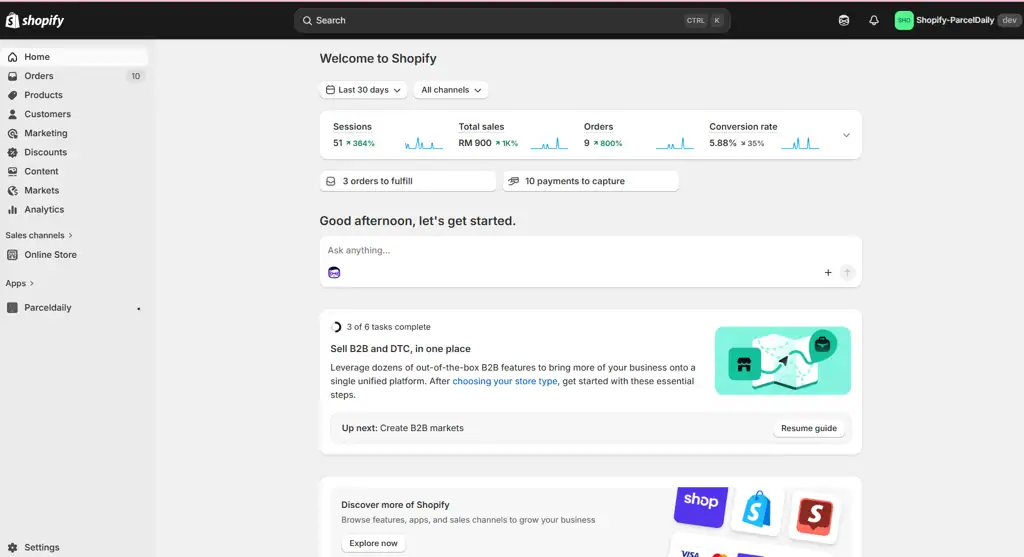
- You will now see your Shopify dashboard (main screen).
Install the ParcelDaily App
- In your Shopify dashboard, go to the Shopify App Store.
- Search for “ParcelDaily”.
- Click on the app, then click “Install”.
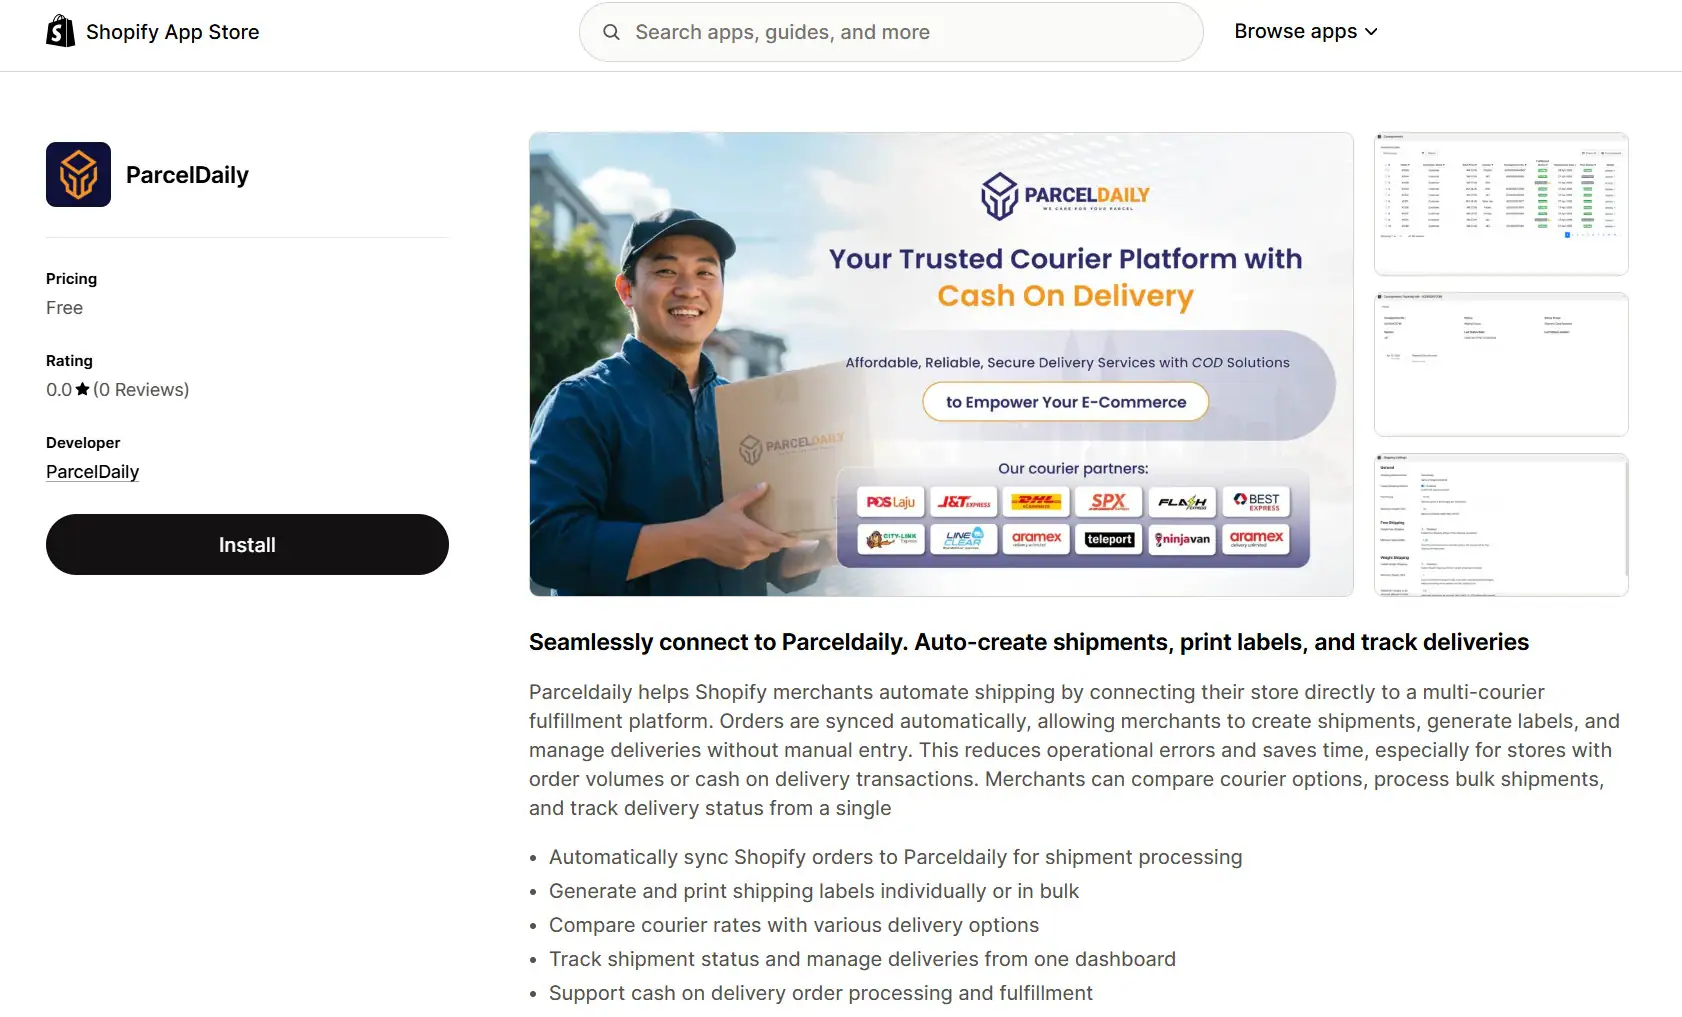
- Follow the steps shown on screen to complete the installation.
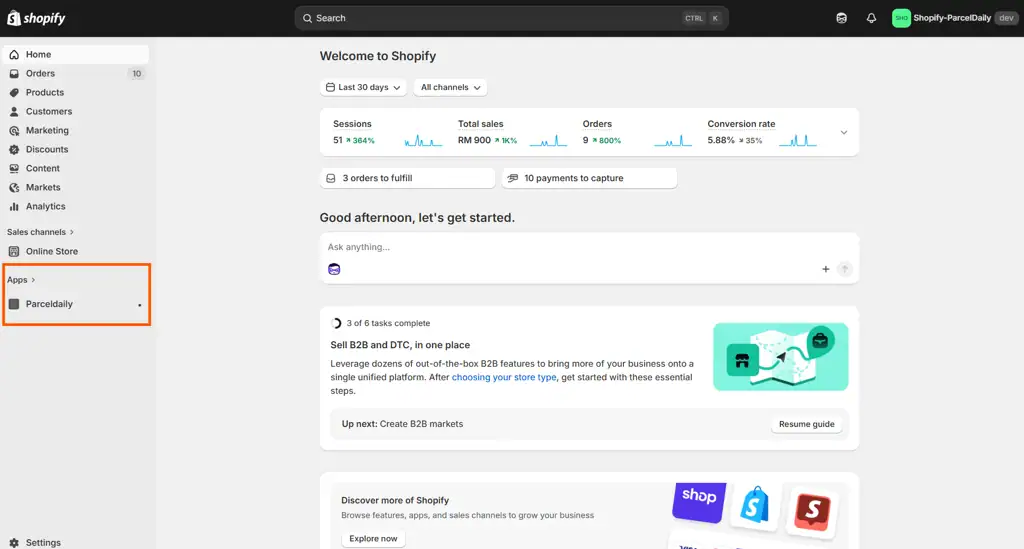
- Once done, you will see ParcelDaily listed under your Apps section.
Set Up the ParcelDaily App
After installing, you need to connect Shopify with ParcelDaily.
Step 1: Get Your Merchant ID and Token Key Details
- Log in to your ParcelDaily account.
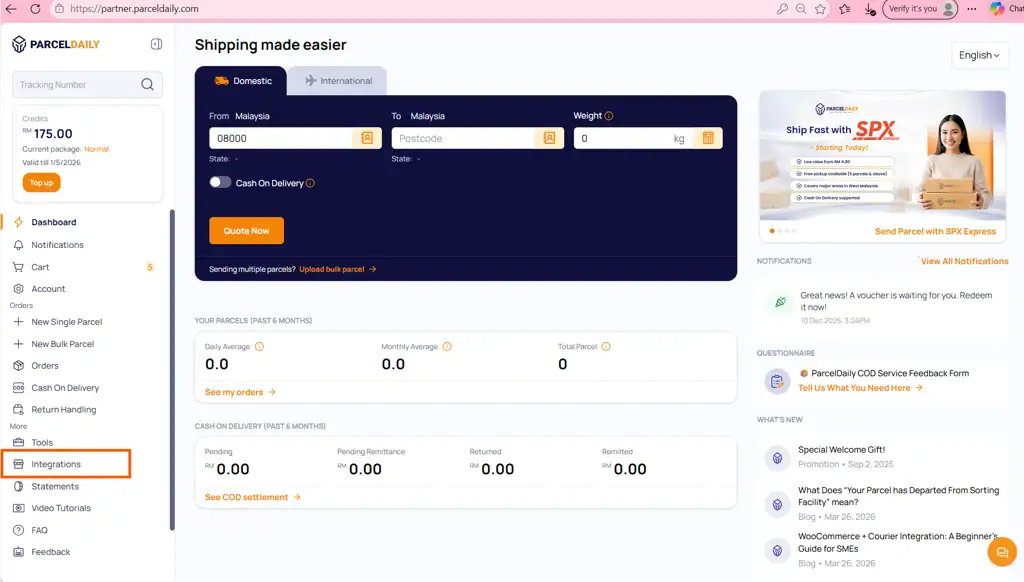
- Go to the Integrations page.
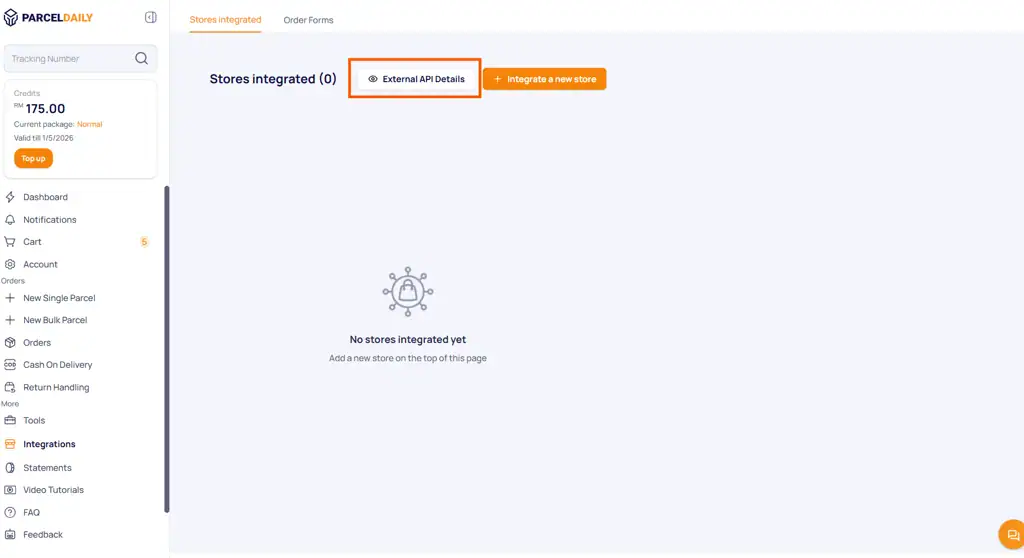
- Click on “External API Details”.
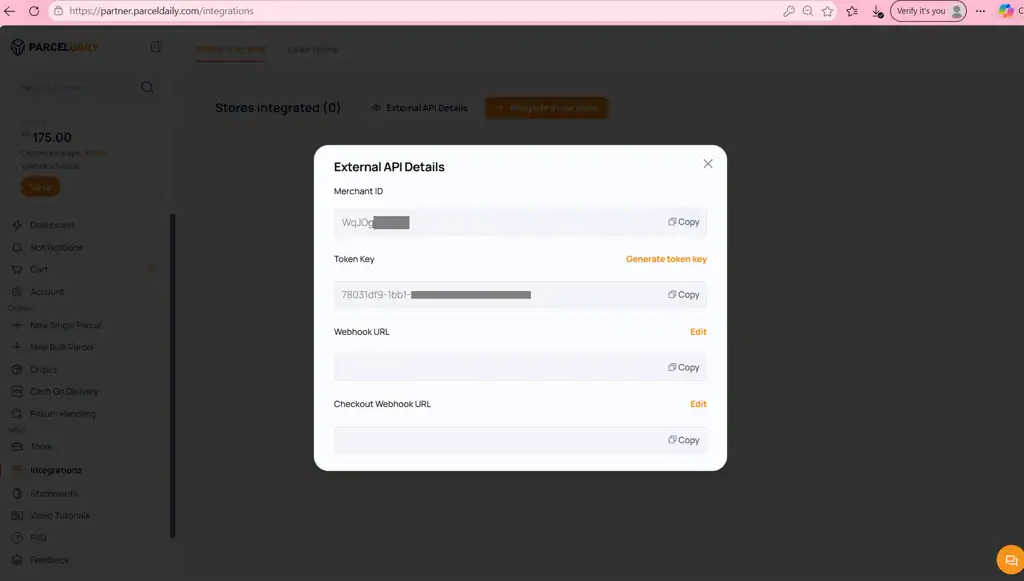
- You will see Merchant ID and Token Key. Copy both of these.
Step 2: Connect Shopify to Parceldaily
- Go to Apps in Shopify.
- Click on ParcelDaily.
- Open App Settings.
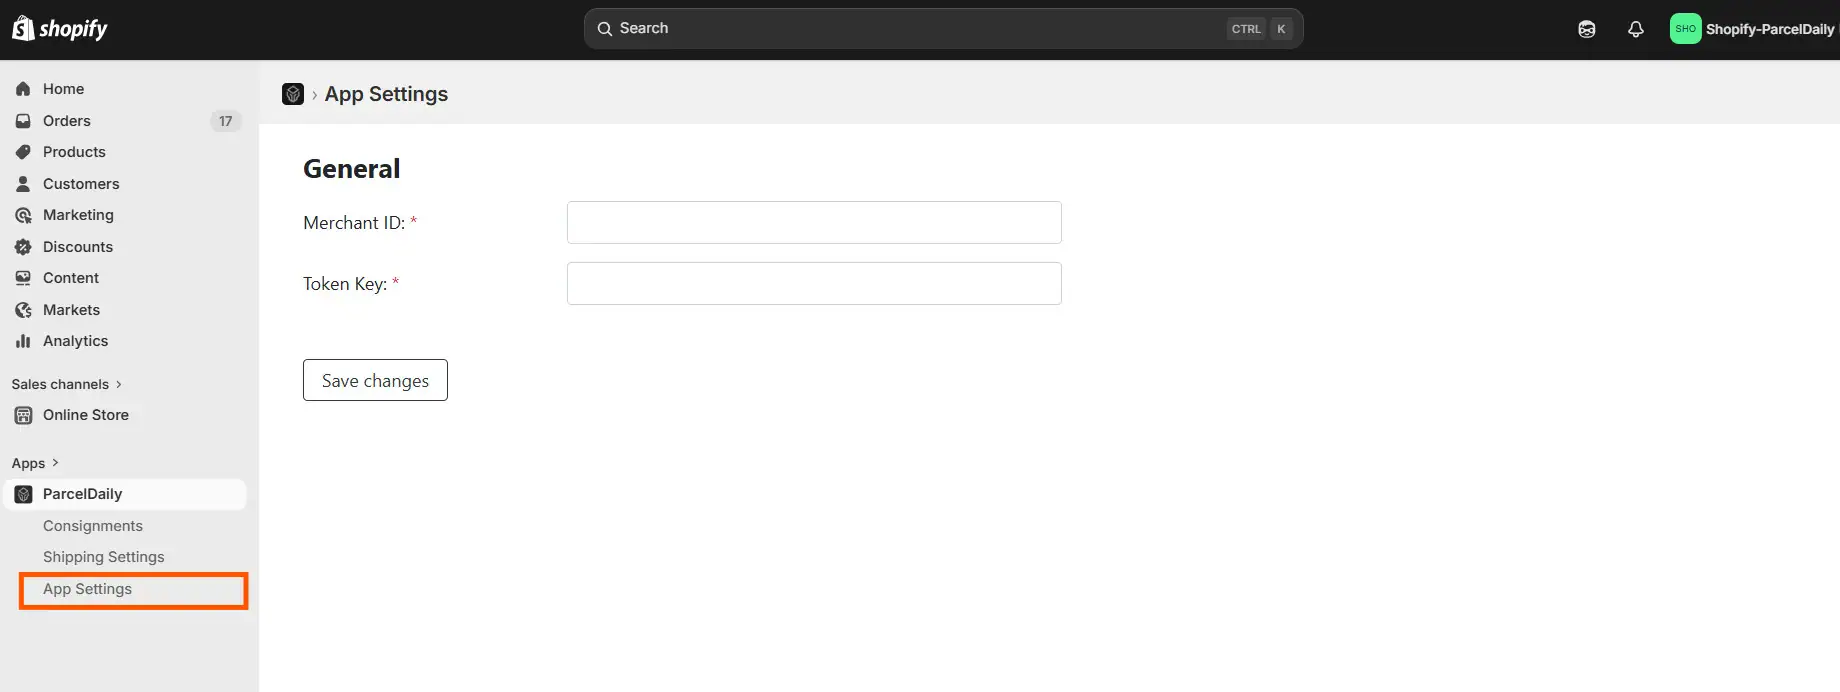
- Paste the Merchant ID and Token Key into the correct fields.
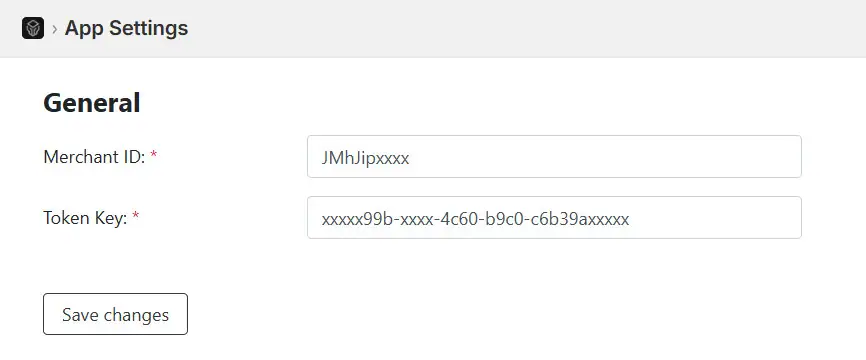
- Click on “Save Changes”.
Step 3: Get Webhook URLs from Shopify
- Once the connection is successful, copy both:
- Checkout Webhook URL
- Tracking Webhook URL
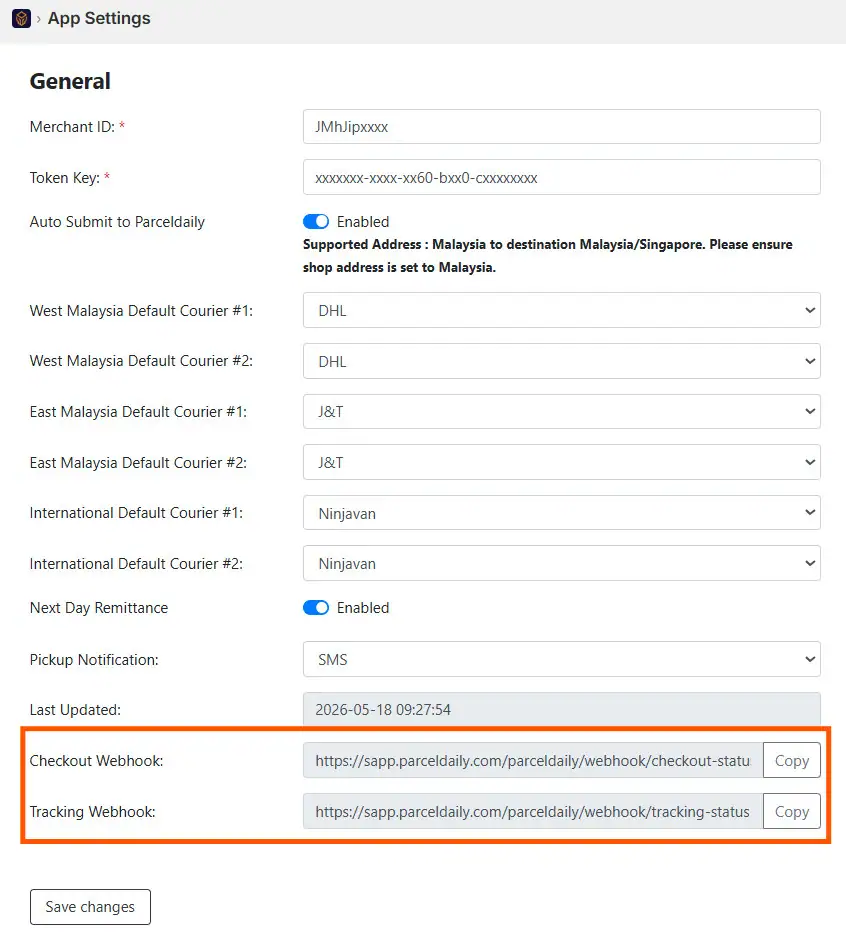
Step 4: Configure Webhook URLs in ParcelDaily
- Return to your ParcelDaily account.
- On Integrations page, click on “External API Details”
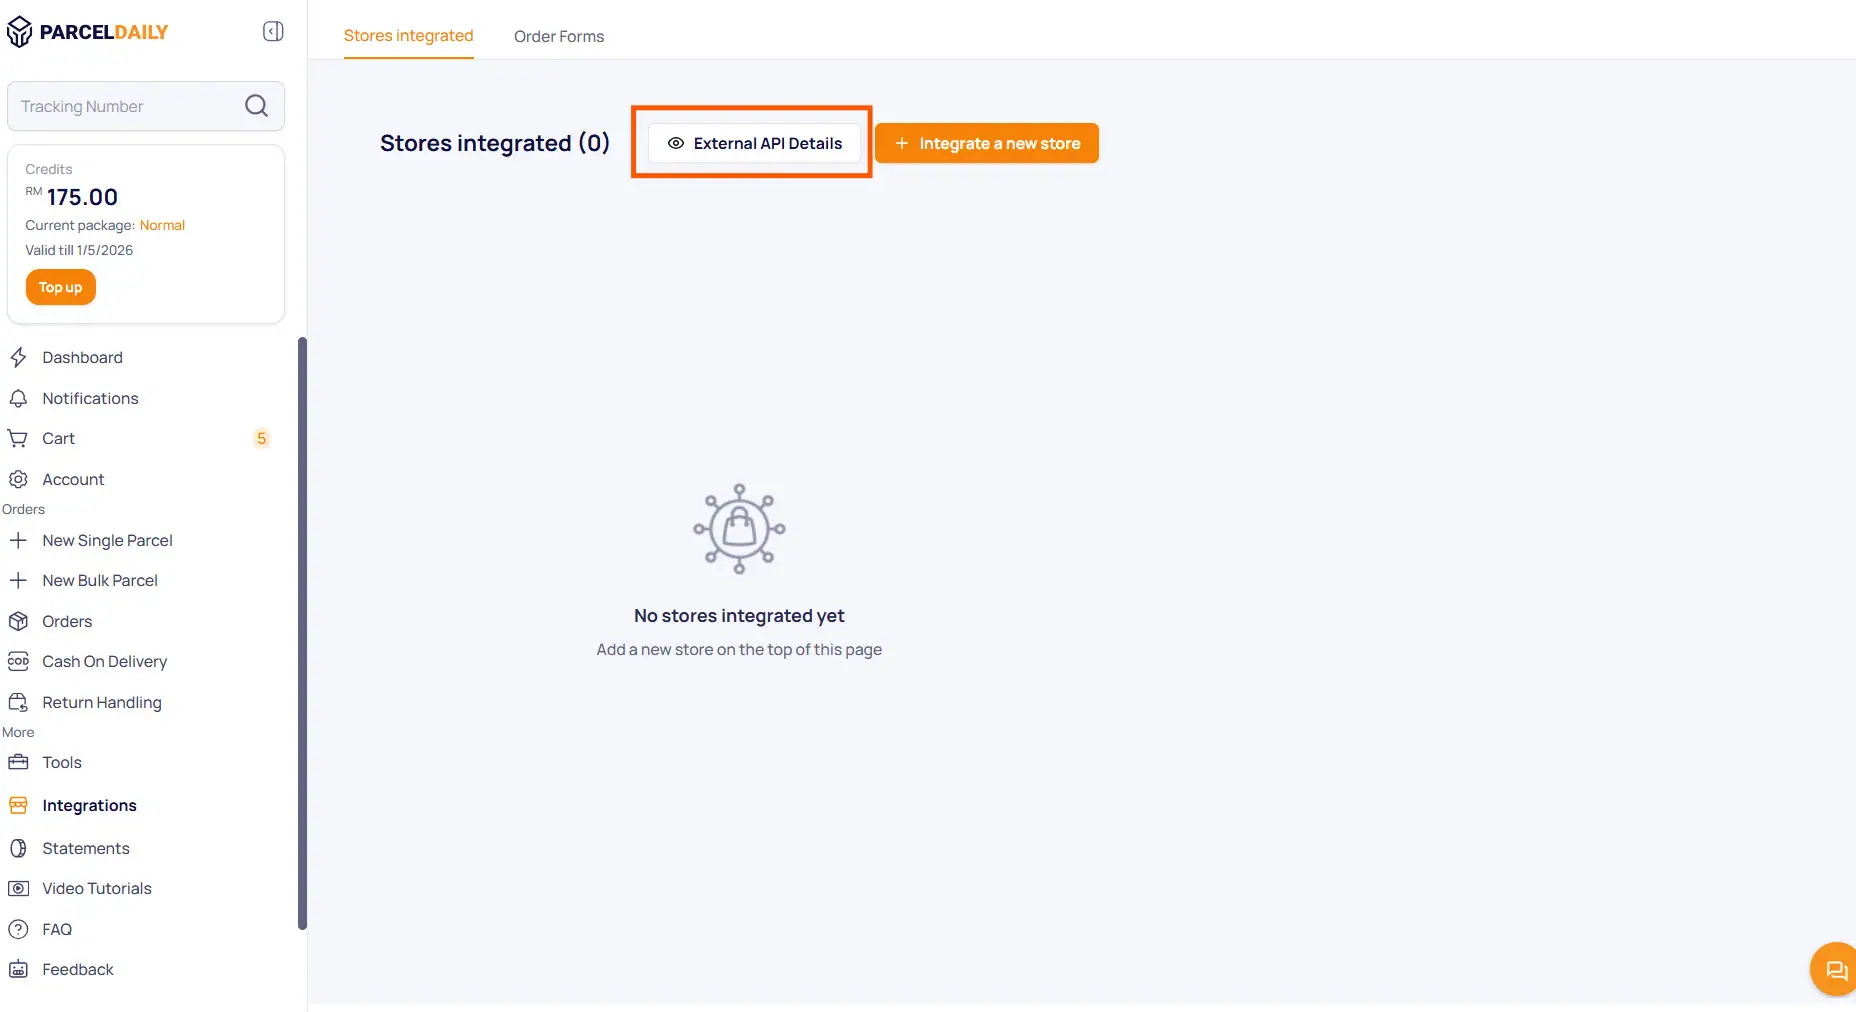
- Click on “Edit”
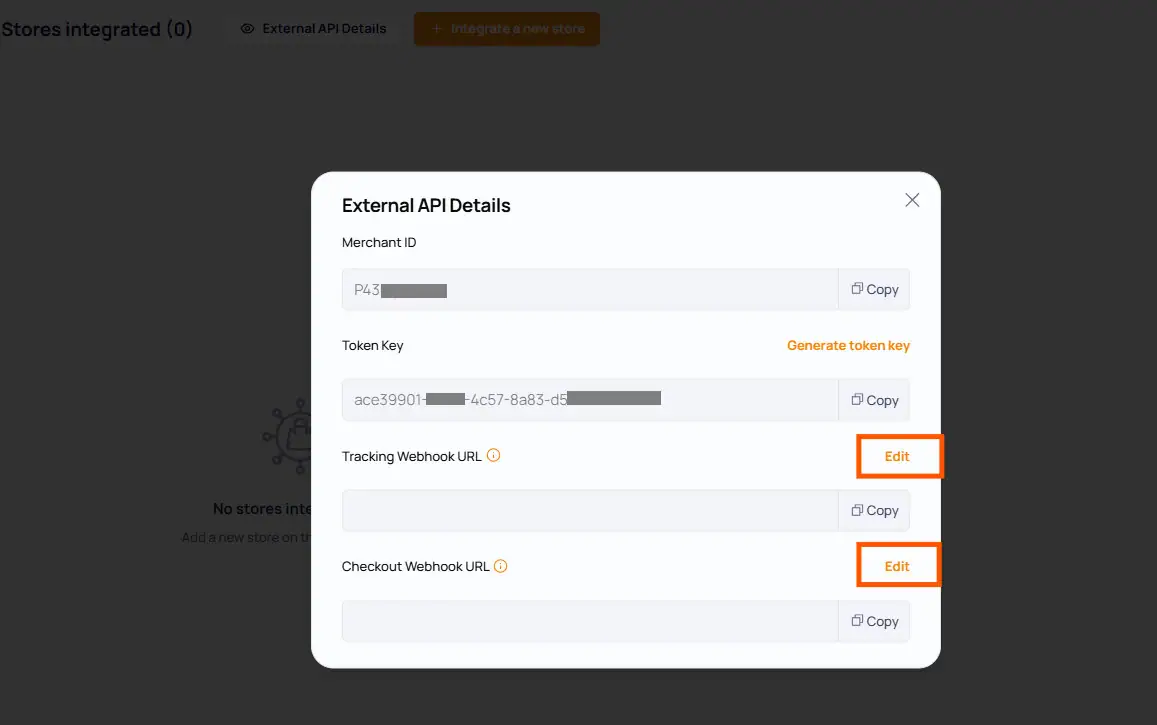
- Paste the URLs into the respective webhook fields
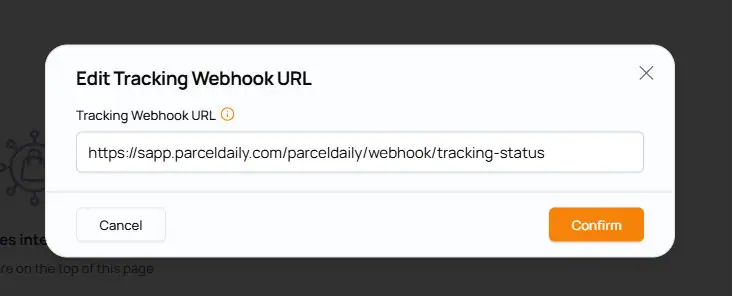
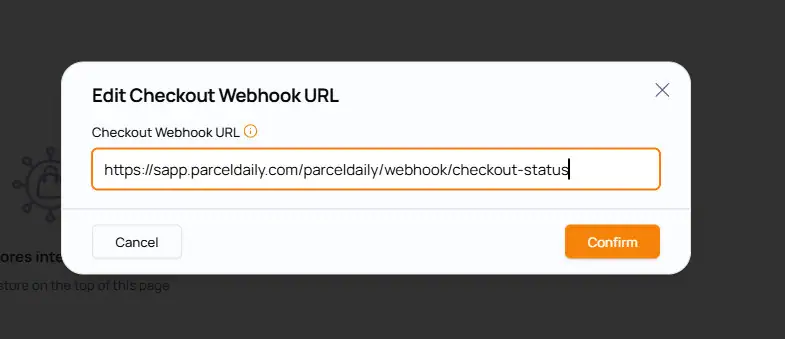
- Click on “Confirm“
Complete the Remaining Setup
Once your connection is successful, there are a few more settings to finish.
Go to App Settings and Shipping Settings inside the ParcelDaily app.
Set up the options based on your business needs, such as delivery preferences and order handling.
Please refer to the Shopify-ParcelDaily Integration document provided for a detailed guide on how to complete these settings.
All Set ! 🎉
After completing these steps, you can start managing orders and deliveries easily.
Shopify-ParcelDaily – Integration Configuration Guide
Introduction
This document provides a user guide for the Shopify–ParcelDaily integration configuration, designed to streamline order fulfillment and shipping operations. The plugin enables seamless data synchronization between Shopify and ParcelDaily, allowing users to automatically submit orders, manage consignments, configure shipping settings, and track deliveries within a unified workflow.
Key features include:
- Automatic order submission from Shopify to ParcelDaily.
- Shipping configuration and courier selection.
- Consignment management.
1. Shopify > App Settings
The App Settings module allows users to configure system-level behaviors for order processing, courier selection, remittance handling, and notification preferences between Shopify and ParcelDaily.
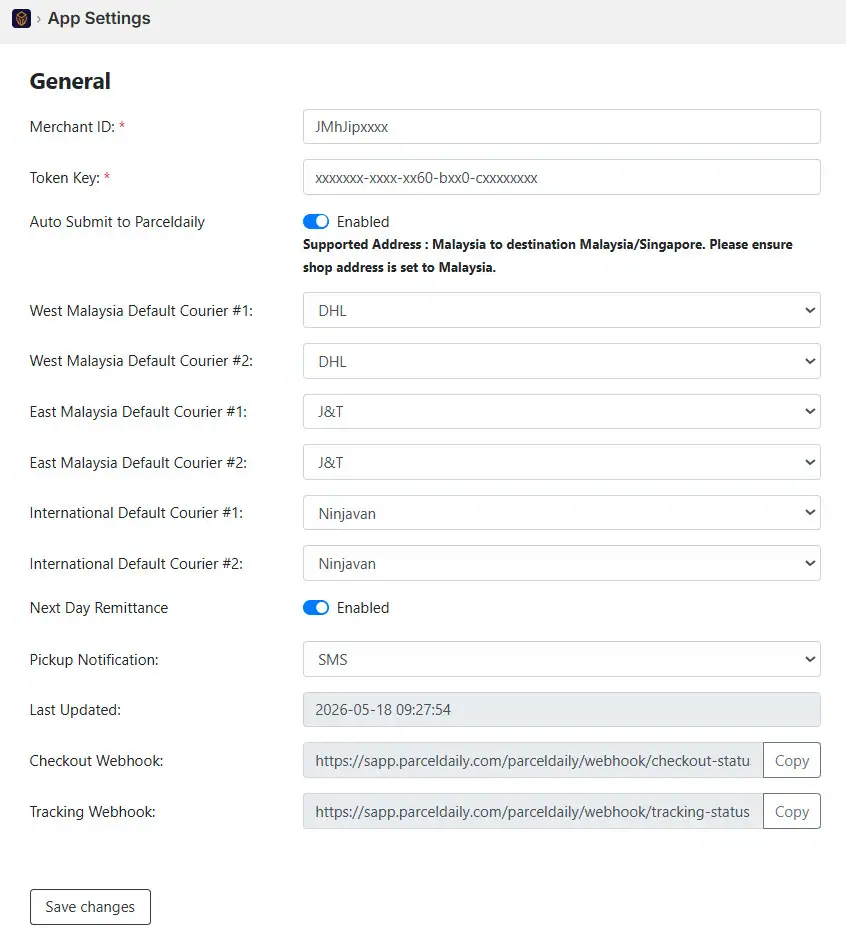
1.1 Merchant ID and Token Key
This setting is required to establish a secure connection between Shopify and ParcelDaily.
1.2 Auto Submit To ParcelDaily
This setting controls whether Shopify orders are automatically sent to ParcelDaily or require manual submission. If enabled, when a customer completes checkout in Shopify, the order goes directly to ParcelDaily.
1.3 Default Couriers Setup
This setting defines the default courier service used when processing shipments based on delivery region. It ensures that orders are automatically assigned to the correct logistics provider without manual selection.
Users can assign different couriers for:
- West Malaysia – Used for domestic deliveries within Peninsular Malaysia.
- East Malaysia – Used for Sabah and Sarawak deliveries.
- International – Used for shipments outside Malaysia.
When an order is submitted, the system detects the destination region. The configured default courier is automatically applied and reduces manual intervention and ensures consistent courier usage.
1.4 Next Day Remittance
This setting controls how orders are handled for Next Day Remittance, particularly for Cash-on-Delivery (COD) payment methods. NDR determines whether an order should be processed immediately and flagged for remittance handling.
1.5 Notifications
This section allows you to configure customer communication channels for delivery updates.
1.5.1 Pickup Notifications
These notifications are triggered when a parcel is ready for pickup.
Supported channels:
- SMS – Standard text message notification.
- Whatsapp – Instant messaging notification.
- Email – Formal notification with shipment details.
2. Shopify > Shipping Settings
The Shipping Settings module controls how shipping fees, rules, and courier selection are applied during checkout.
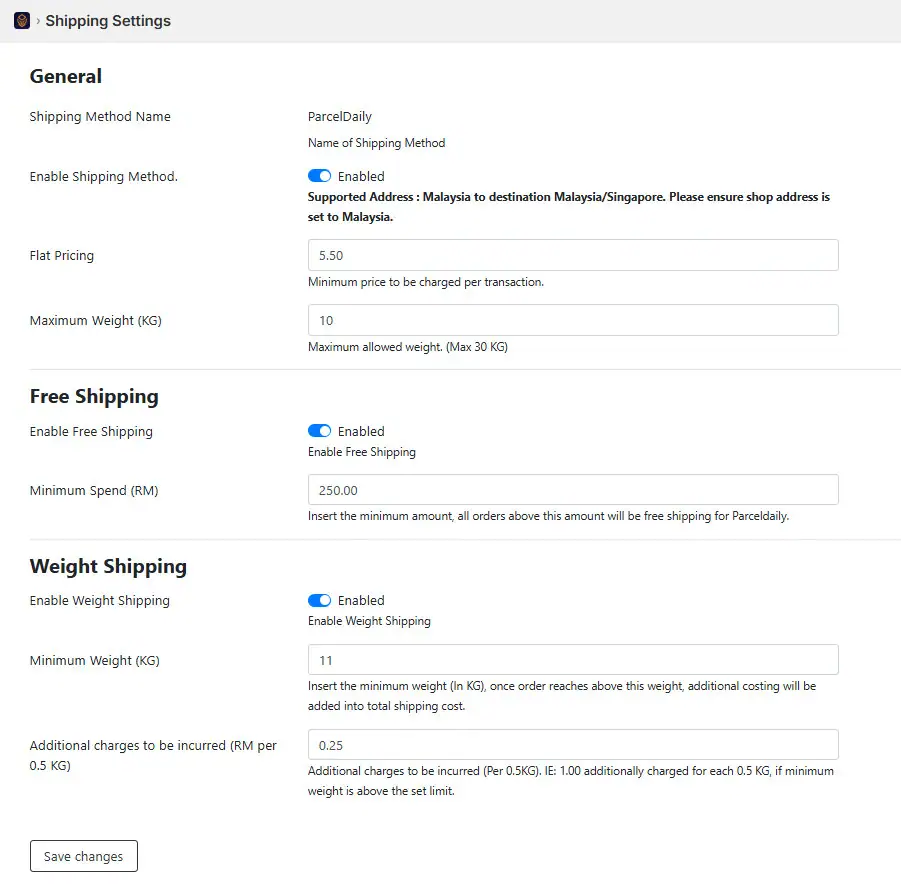
2.1 General Settings
This section defines the core shipping behavior used by the system when processing orders between Shopify and ParcelDaily. These settings control how shipping methods are applied, how fees are calculated, and how tracking updates are communicated.
Configuration Options:
- Enable Shipping Method: Activates shipping functionality in the system.
- Flat Pricing: Applies a fixed shipping fee regardless of weight or location.
- Maximum Weight: Defines the upper weight limit allowed per shipment.
2.2 Free Shipping Settings
This feature allows businesses to offer free shipping promotions when certain conditions are met.
When Free Shipping is enabled, the system evaluates each order against a predefined minimum spend threshold:
- If the order value meets or exceeds the threshold, the shipping fee is waived (RM 0).
- If the order value is below the threshold, normal shipping charges apply.
Configuration Options:
- Enable Free Shipping: Activates or deactivates the feature.
- Minimum Spend Requirement: Defines minimum order amount to qualify for free shipping.
2.3 Weight Shipping Settings
The Weight-Based Shipping feature calculates shipping fees dynamically based on the total weight of the order. This ensures fair and accurate pricing, especially for heavier shipments.
Shipping cost is calculated using:
- A base weight (minimum weight).
- Additional charges applied for every weight increment (e.g., per 0.5kg).
Configuration Options:
- Enable Weight-Based Shipping: Activates weight-based pricing logic.
- Minimum Weight: The base weight threshold (e.g., 0.5kg or 1kg).
- Additional Charges: Extra cost applied when weight exceeds the minimum.
3. Shopify > Consignments
This module allows users to manage shipment records, perform actions such as printing labels, tracking orders, and filtering consignments for easier tracking and operational control.
3.1 Consignment Filtering
Users can filter consignment records to quickly locate specific shipments based on submission criteria. It allows users to view consignments based on the date the order was submitted to ParcelDaily.
User can apply a date filter to:
- View consignments submitted on a specific day
- Filter by date range (e.g., weekly, monthly).
3.2 Print Function
This function allows users to print shipping labels.
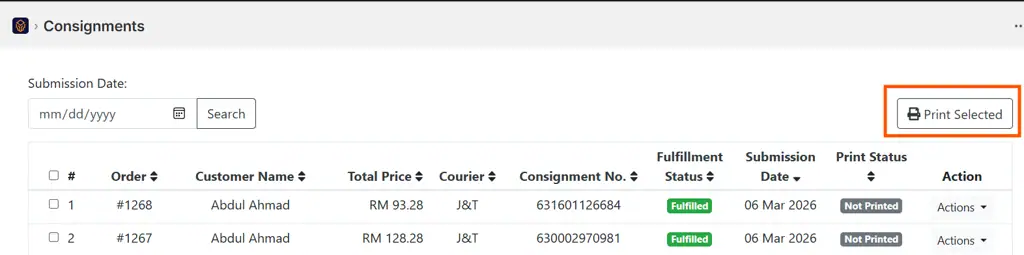
Rules:
- At least one consignment must be selected
- Printing behavior depends on order status:
Status Fulfilled Successfully printed Not Fulfilled Printing will fail Mixed (Bulk) Only fulfilled orders printed 3.3 Available Actions
User can perform the following actions:
- Print Label: Generate shipping label for selected order.
- Check Status: View latest shipment status.
- Tracking Info: Display detailed tracking information.
- Tracking Page: Redirect user to ParcelDaily tracking page in Shopify.
- Resubmit Order: Re-send order to ParcelDaily if not fulfilled.
4. Order Flow Process
This section explains how orders move from Shopify to ParcelDaily using automatic or manual submission flows.
4.1 Auto Submit to ParcelDaily
The Auto Submit feature allows orders to be automatically sent to ParcelDaily once they are created in Shopify, without requiring manual action.
4.1.1 How It Works
Once a customer successfully places an order in Shopify:
- The order will be automatically submitted to ParcelDaily.
- A consignment (shipment) will be created.
- The order will be ready for shipping label generation and tracking.
4.1.2 What You Will See
After auto submission is successful:
- The order will appear in ParcelDaily.
- A consignment number will be generated.
- Order status will be updated (e.g., Fulfilled).
- You can proceed to:
- Print label
- Track shipment
4.1.3 When Auto Submit Does Not Work
In some cases, the order may not be submitted automatically. Common reason include:
- Invalid or missing Merchant ID / Token Key.
- Incorrect shipping configuration.
- Invalid delivery details (e.g., postcode).
Important Notes
- Auto Submit only works if the feature is enabled in App Settings.
- Courier selection is based on postcode, even if the state does not match.
- Shipping charges are automatically deducted upon successful submission.
4.2 Shopify Manual Submit
The Manual Submit process allows users to control when an order is sent to ParcelDaily. This is typically used when auto-submit is disabled or when manual verification is required before shipment.
User can submit orders using two methods:
4.2.1 Method 1: Submit from Order List
- Navigate to Orders in Shopify.
- Select one or multiple orders.
- Click “…” More Actions.
- Under Apps, click: Submit to ParcelDaily.
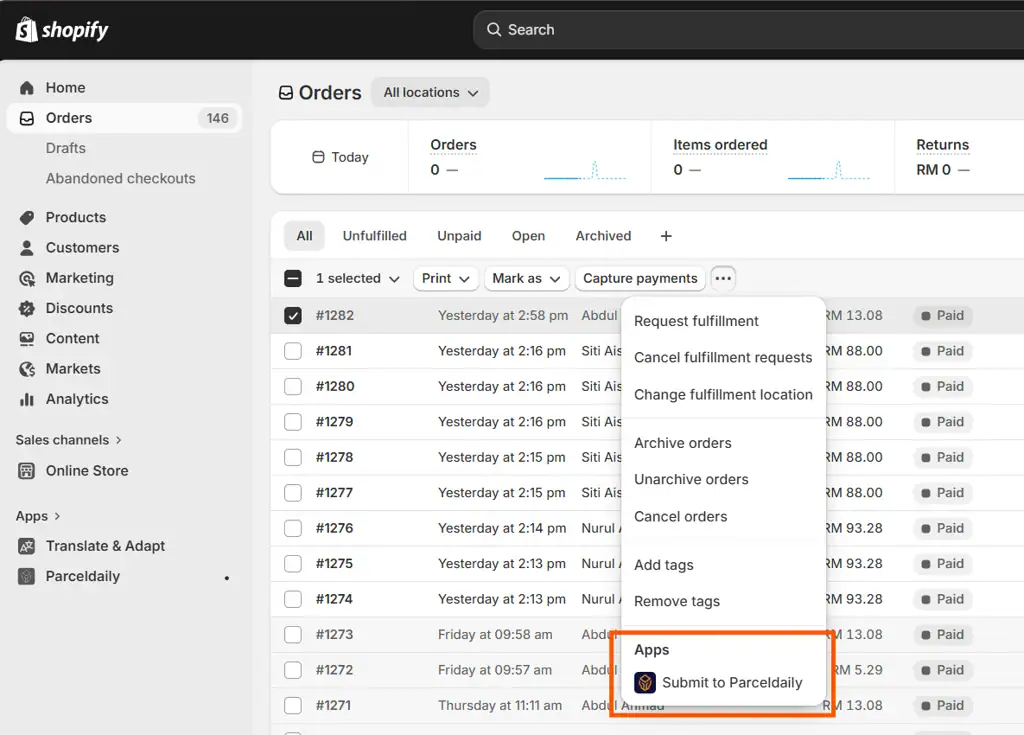
Use Case:
- Bulk submission.
- Faster processing for multiple orders.
4.2.2 Method 2: Submit from Order Details Page
This method allows users to submit a specific order individually.
- Navigate to Orders in Shopify.
- Click on a specific Order ID to open details.
- Click “More actions” (top right).
- Select: Submit to ParcelDaily.
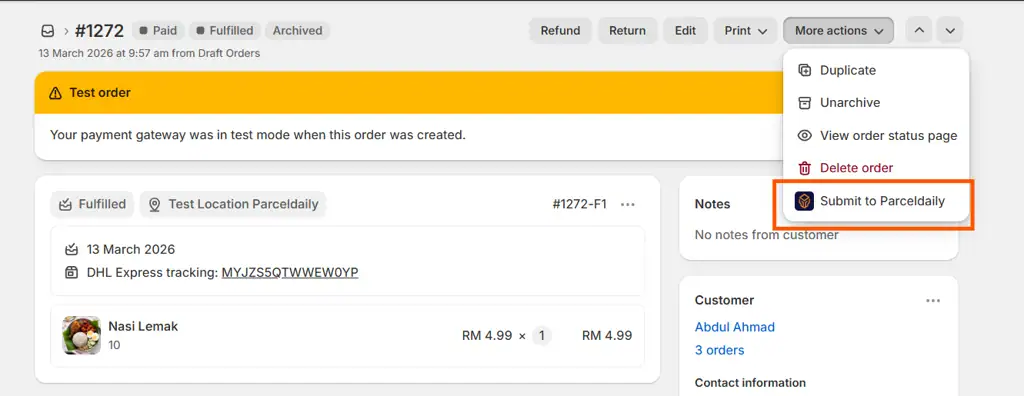
Use Case:
- When reviewing a single order in detail.
- When troubleshooting or verifying order information before submission.
Overview
This section explains how to remove the old store integration after successfully switching to the new integration. The new integration supports automatic order synchronization and checkout. The old integration is no longer required once migration is completed.
⚠️ Important: Deletion is permanent and cannot be undone.
Before You Delete
Please make sure the following are completed before proceeding:
- All orders from Import Shop Order have been imported and added to your cart.
- The new integration is active and working properly.
- There are no ongoing actions (such as importing or checkout in progress).
How to Delete the Old Store
-
Log in to your ParcelDaily account.
-
Go to the Integrations page.
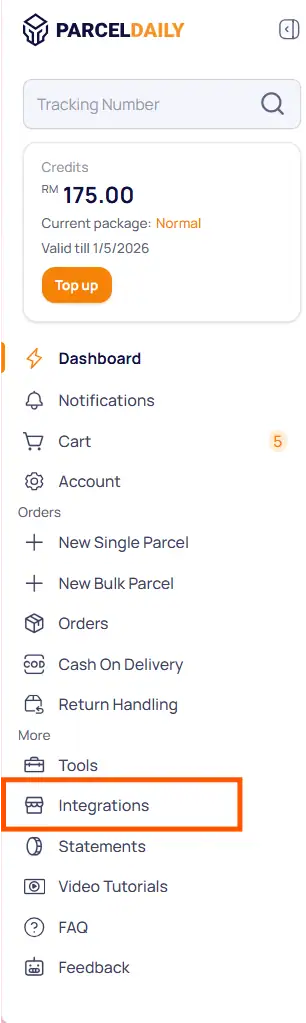
-
Find your old store integration.
-
Click the delete (bin) icon next to it.

-
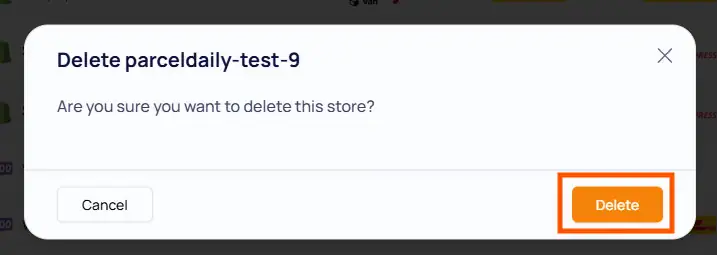
Review the confirmation message.
-
Click Delete to confirm.
After Deletion
Once deleted, you can check that everything is working as expected:
-
The old store is no longer listed.
-
New orders are automatically processed through the new integration.
-
Existing orders remain unchanged in your Cart and Order List.
You’re All Set 🎉
Your store is now fully running on the new integration. You can continue managing and processing your orders as usual, everything should work more smoothly from here on.
If you notice anything unusual, feel free to reach out to support for help.
